Simple, Unitary SURs, at last.
But after reading Dev's article about "sewing" SURs together, I just had to try this 'orrible little monster out one last time. Guess what? I think I have a solution for y'all. It involves a fair number of steps, but they're easy as pie. Really.
Ok...
Step 1: Make your Ship. Export your CMP/MAT, etc.
Step 2: Make your SUR.
This must consist of 100% WELDED, CONVEX MESHES. All of the words that are in caps are in caps... because if you don't, this won't work. If you're not sure what I mean, then you need to just stick with boxes, but I have tested with other concave shapes, and it works!
One VERY IMPORTANT STEP that you MUST NOT FORGET:
Make one box, of any size, inside your model. Call it "HpShield01".
Now you have your SUR, and it roughly matches the geometry of your ship, but is made of multiple CONVEX MESHES.
Step 3:
Import your SUR model into Milkshape3D. TURN OFF AUTO SMOOTH FIRST. If you don't know what I'm talking about, here's the setting. TURN IT OFF.

Select all of the meshes, then Go to the Vertex Menu and select "Weld Together". This will weld all of the verts.
Step 4: Apply a Material to the objects in your SUR, and EXPORT AS A CMP. Yes, a CMP! We'll be using it later, trust me!
Step 5: Export your SUR mesh. Export in 3DS FORMAT. Not OBJ, not DXF, not whatever-you-feel-like-it... you MUST USE 3DS. This is because 3DS does not retain welding information within the format. It's a technical lesson I learned modeling for Spring, but it's an important little point.
Step 6: Import your 3DS version of your SUR into LITHUNWRAP. The download for that can be found here. Also, I keep it on my website.
Once in LithUnwrap, go to Tools, and select, "optimize model". This will strip all of the extra verts out- VERY IMPORTANT. This is called "fully welded", and it's required by the SUR exporter.
Now, you have this fully welded 3DS file, what do ya do?
Step 7: Export from LithUnwrap AS 3DS, and import back into MS3D. Your model, by this point, should look like this:
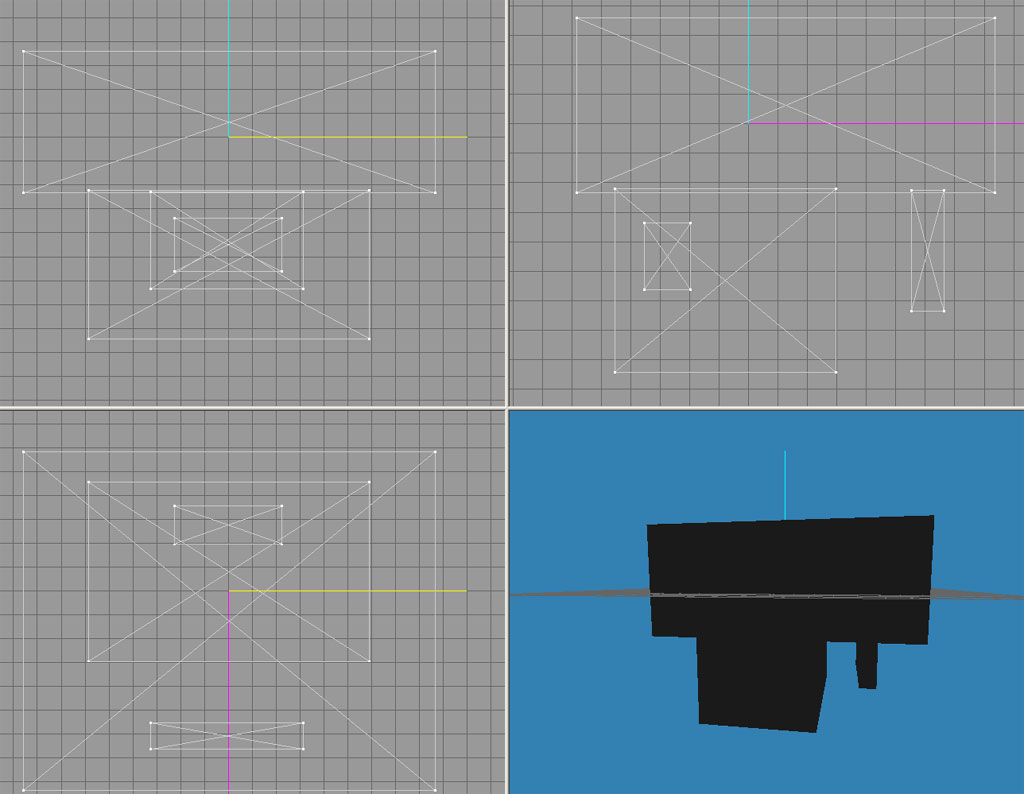
Notice that it's BLACK. If it's anything but BLACK, you've done something wrong. It's BLACK because you've removed all of the normals from this model, so MS3D doesn't know how to shade it anymore. Guess what? That's COMPLETELY NECESSARY to export a good, multipart SUR in one go.
Step 8: Now, this part's a little counter-intuitive, but here's whatcha need to do. When using Colin Sandby's SUR EXPORTER 1.1 (not 1.2 !!!), it doesn't make the Shield bubbles right for long skinny things, or things with weird geometry. And any part of a SUR that is not inside the Shield Bubble that his Exporter makes WILL NOT WORK. This is the part that kept screwing me up, honestly.
To get around this... it's really, really easy. Just select all the meshes, and use Scale until your entire model can fit within a cube (actually, a sphere, but meh) WITHOUT POKING THROUGH IT. Do not worry about distorting it, so long as you use SCALE, and use the WHOLE MESH, you are fine! Trust me!
WHEN YOU ARE DONE, SAVE THE MS3D FILE, RIGHT NOW, AND RE-OPEN IT. This will reset the Origin- very important!
Step 9: Ok, now you have a squashed mesh, that would fit within a sphere. It's time to... zomgosh... EXPORT THE SUR.
USE THESE SETTINGS:
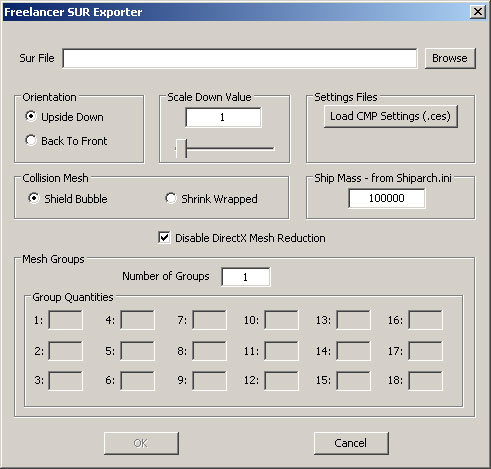
Do not, under any circumstances, use Shrinkwrap, or turn on the DirectX Mesh Reduction. They are both from the devil, at least with 1.1.
Step 10: Ok, now you have this CMP, of the SUR in the original dimensions... and a SUR that's all distorted. Guess what? You're going to use the CMP to fix the SUR.
Load the CMP, and use FLModelTool to set its proper size. Do not worry about scaling it to your ship, etc., etc. Just do it.
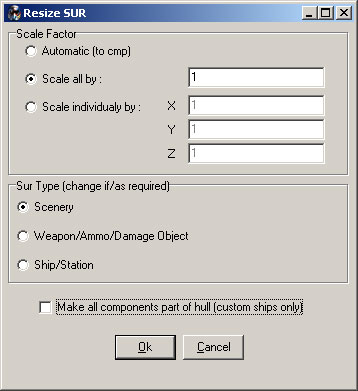
Step 11: Load the SUR, and use the FOLLOWING SETTINGS:
Step 12: Save the SUR, re-open it, and use the FOLLOWING SETTINGS:
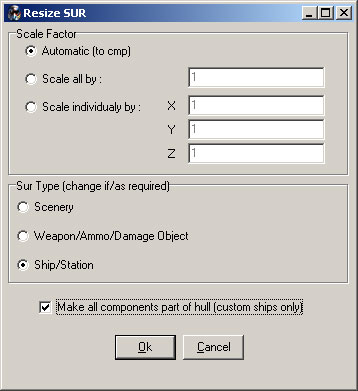
Save your SUR.
Step 13: Open your SHIP CMP, which I am assuming you've already scaled, etc. with FLModelTool. And resize the SUR, using the FOLLOWING SETTINGS:

..... That's IT! Time to check your handiwork. Open the Ship CMP in HardCMP, and check the SUR out. It should look something like this:
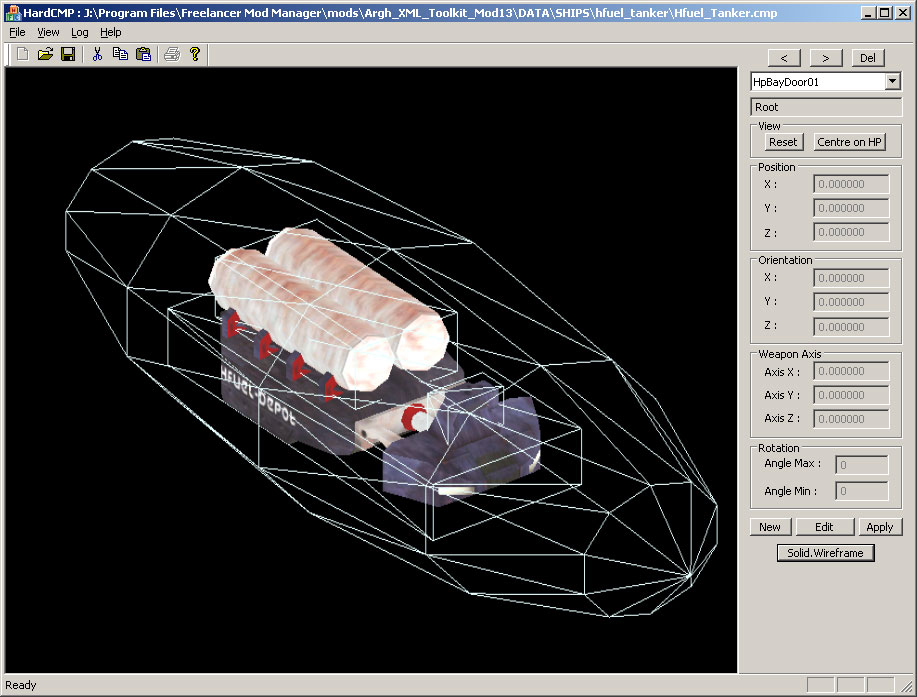
See? The process we used returned the distorted, squished geometry back to the original shape, because EVERYTHING WAS SCALED at ALL STEPS. Cool, eh?
Now, go test your SUR!
I have made 2 SURs, and they WORK. The only quibble I have, which everybody here knows about, is that large custom SURs have the unpleasant ability to cut through DA's original SURs (such as Stations) sometimes. But, these ones are actually detecting impacts so well that this isn't as big of a problem as my old ones!
Here are the sample SURs, and sample geometry/test setups, so you can see what I'm talking about, if you want to see what I did in more detail. One assumes you have Toolkit 1.3 lying around, so that you can replace the original Hfuel_Tanker.sur with it, and see for yourself... that it darn well works!
Now, will this work, for ships with break-off parts? No. Use Dev's method, which is much more of a pain in the butt. From what I see, it works just fine, it's just a painful experience, whereas this is really quite quick, once you know what you're doing.
Last notes: this was all tested, implemented, and done with MS3D 1.7.5. Older versions may very well not work, and I do not have the very latest upgrade, but this one's only about 3 months old. And yes, I bought mine, kids
Edited by - Argh on 4/17/2007 10:19:26 PM
